Jarred Watson is a pyrographer with 10+ years experience and has worked with brands like BOSCH & FORD. He is always looking to learn and share his passion of wood burning with others. Finally, you can use a transfer tip or a flat tip that transfers the ink of a printed image on wood. Heat the transfer tip then brush the back of the paper where the ink is with the transfer tip. If you are an artist then you may find freestyling a better way to transfer image in wood. This may not be the easiest technique but it is the quickest plus will help you practice making different strokes as well.
Triple Bunk Bed Ideas Your Kids Will Love
I'm a rocket scientist designing wood stoves that burn without smoking–to save lives and save the planet - Quartz
I'm a rocket scientist designing wood stoves that burn without smoking–to save lives and save the planet.
Posted: Thu, 16 Jun 2016 07:00:00 GMT [source]
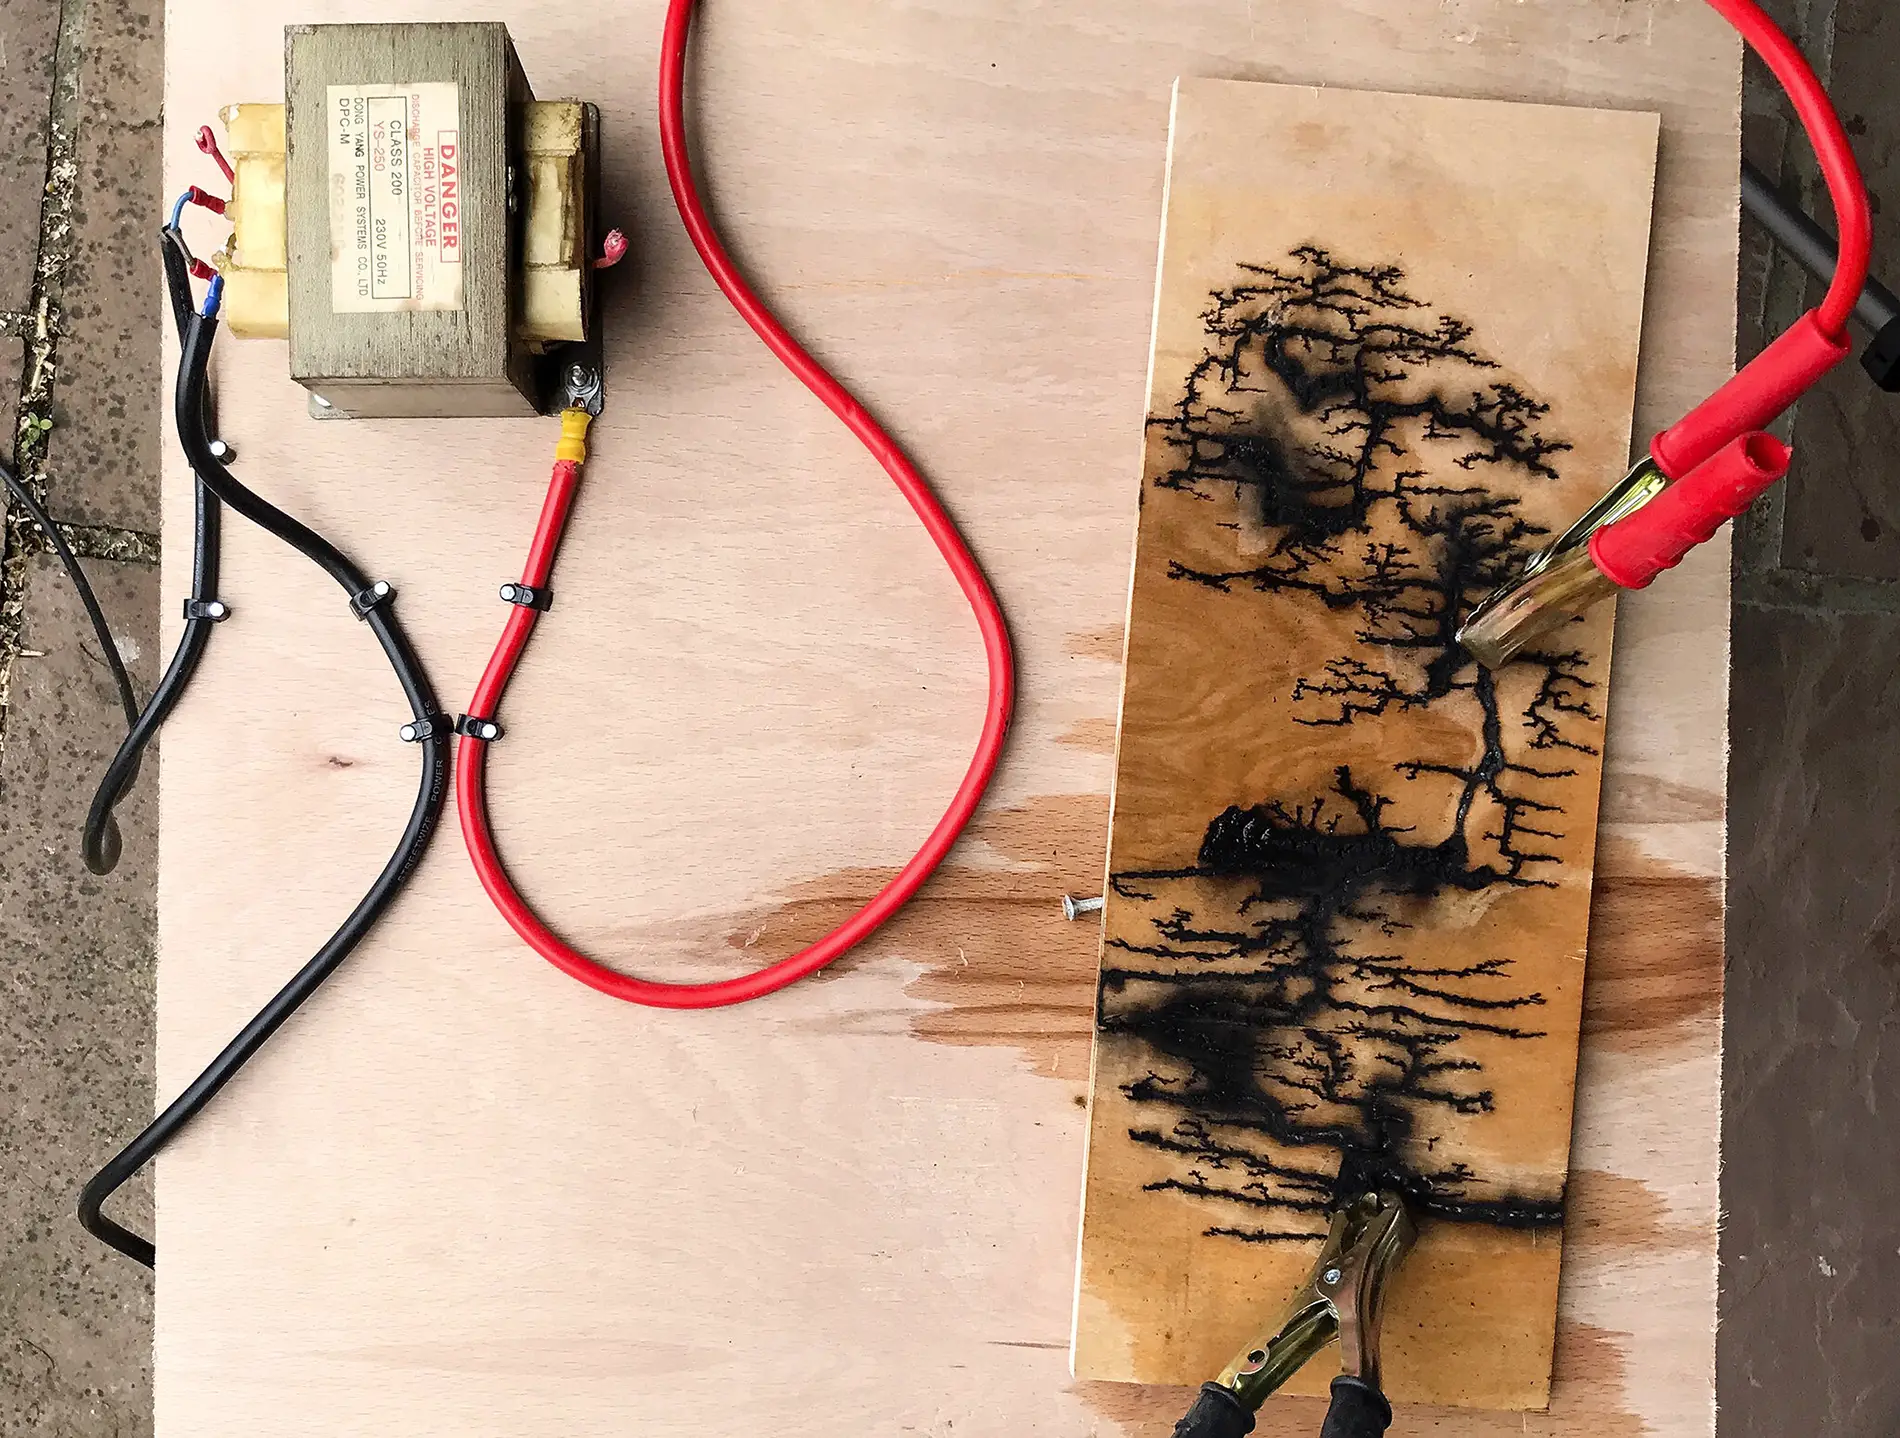
Discover the step-by-step process and techniques for creating unique and captivating wood designs. Enhance your burnt wood design by learning how to burn lightning patterns into the surface. Discover step-by-step techniques for creating captivating and unique designs that will impress with their intricacy and beauty. Burnt lightning patterns in wood have a captivating allure that is hard to resist. The unique and intricate designs created by burning lightning into wood grab attention and evoke a sense of wonder.
How can I clean and maintain my woodburning pen tips for optimal performance?
The process of preparing the wood before burning designs with a torch is crucial for achieving high-quality results. Proper preparation ensures that the wood surface is smooth, free from imperfections, and ready to accept the burn marks efficiently. This section outlines the essential steps to follow when preparing the wood for your torch-burning project. Choose a butane torch with a small, precise flame, allowing you to control the heat and create detailed designs.
Heavy Duty Little Wood Burning Stove Review - Forestry.com
Heavy Duty Little Wood Burning Stove Review.
Posted: Fri, 06 Oct 2023 07:00:00 GMT [source]
Designs Wood Burning Ideas for Chests of Drawers
Over-burning can cause irreversible damage to your project and make it difficult to achieve the desired effects. Adjust the pressure and temperature settings as needed to achieve the right balance. Take your time while working on your design, and avoid rushing through the process. Working slowly allows for better control and accuracy, ultimately leading to a more polished finished project. Overheating can damage your woodburning pen or the wood surface.
Trending Articles
Before you begin, be sure to protect your work surface to prevent any damage from the heat of the torch. You can place a heat-resistant mat, such as a silicone or ceramic pad, underneath your wood piece to shield the underlying surface from scorch marks or burns. Additionally, consider using a non-flammable covering for the surrounding area to further safeguard against accidental fires or damage. When working with open flame, it’s crucial to prioritize safety. Safety equipment such as protective goggles, gloves, and a fire-resistant surface is essential to prevent accidents and injuries. Goggles safeguard your eyes from sparks and debris, while heat-resistant gloves protect your hands from direct contact with the torch and hot wood.
Types of torches
Robert is the brain behind Sawinery, where he aims to share tips, tricks, and a passion for all things carpentry. But regardless of that, adding words and initials on the top surface is the main point of this idea. In fact, crafting your wood-burned garland allows you to repurpose these decors for other occasions. These patterns are often repeated throughout the surface, so you’ll need more attention to detail. If you’re a musician who’s also passionate about woodworking, having a guitar with your wood-burned initials can represent two of your aspirations. Depending on the pattern you choose, Pyrography can add a touch of rustic elegance to your table.
Wood Paneling FAQ
To burn wood art with a torch, first, choose the type of wood and a suitable torch. Next, carefully burn the wood using the torch, moving it slowly across the surface to create the desired effect. Mastering the use of various torch angles is essential for achieving compelling shadow effects in wood-burning designs.

When outlining or tracing, it is important to use a light hand and apply even pressure to the tool. Our goal is to inspire and educate others who share our passion for woodworking. Whether you're a beginner or an experienced woodworker, we believe that there is always something new to learn. So from my tests I decided I really like the result of the Ammonium Chloride the best.
Step 9: Background Techniques
Whether you want to add a touch of nature-inspired beauty to your furniture or showcase your artistic skills, this technique offers endless possibilities. As you experiment with different types of wood, techniques, and finishes, remember to stay safe and follow proper safety precautions. Remember that burnt lightning woodwork offers endless opportunities for creativity and artistic expression.
It may appear like another wooden box project, but labeling it through wood burning gives a different touch. Instead of tips, you can use stamps on this piece for a more uniform appearance. Although you can choose from many wood burning ideas, you must know that burning intricate details on wood requires advanced skills and demands time. If you don’t know what a trivet is, it’s a coaster made of cork placed under a hot object. Unlike solid wood pieces, cork has a slightly softer structure.
Before transferring pieces of the map, sand reclaimed wood first. This wood-burned world map helps you preserve your remarkable travel memories. Sawinery is a one-stop source for anything woodworking-related. It’ll work well if you’re required to stencil and carve the project. Instead, you’ll need to use sliced lumber to create the ornament. It’s a perfect decor for a rustic-themed home and can be achieved easily using a highly heated pen tip.
To add color with colored pencils, choose a set of high-quality colored pencils and carefully color in the areas of your design that you want to add color to. Use a light touch and layer the colors to create depth and texture. Stippling and pointillism are techniques that involve using small dots or marks to create a pattern or image.
If you are new to wood burning, there are a few things you need to know before you start. You can use it on almost any type of wooden furniture or decor item, including tables, chairs, picture frames, shelves, and even doors. There are no real limits to the designs that you can create either – from simple geometric patterns to more complex images like landscapes or animals. As a beginner, consider starting with simple wood burning projects like coasters, picture frames, or wooden spoons. You can also create personalized gifts such as keychains, ornaments, or bookmarks. Once you become more comfortable with the techniques, you can move on to more complex projects like wall art, decorative boxes, or even furniture accents.
Another technique is using graphite paper where you will draw an image on graphite paper and then this will be transferred to the surface instantly. After use, clean your heat pen tip with strop and aluminum oxide. You may need to loosen a screw at the tip of the heat pen to remove the current tip and replace it with a new one. To burnish wood, vigorously rub the workpiece with handplane shavings for a glass-smooth finish. Burnishing is a technique used by professionals to achieve a certain appearance and is commonly used...
Furthermore, it’s the art of carving images into wooden pieces using hot tools. Also, this kind of craft lends such objects some character and lasting elegance. With these items, you can create intricate designs that add a unique touch to your wooden projects. Wood burning stencils are a great way to add unique and personalized designs to your woodworking projects. Wood burning stencils allow you to create intricate designs on wood without the need for complex and expensive tools. With the right tools, a few simple steps, and a bit of practice, you can create beautiful pieces of art with wood burning stencils.


No comments:
Post a Comment